Showing posts with label Lay ups. Show all posts

Wednesday, March 23, 2016

Basic Lay-ups

Lay-ups are the backbone of any team offense and every player's offensive repertoire. Without the threat of a lay-up, all other shots would become next to impossible. Just think, how you would defend if you knew that lay-ups were not allowed? What offense, what screens would be set, what dribble or one – on – one move would you make if you could not take a lay-up?
Interesting food for thought. Yet the lay-up is the shot we spend the least time on and the most technically ignored shot of all.

How do we make lay-ups?

I ask you, what part of the body allows you to make lay-ups? Your hand? Your arms? Your legs?
I think you make lay-ups with your eyes. With all that goes on around you during a basketball game, that activity level increases ten-fold as you get closer to the basket. There are more players, more defenders, more hands, and more contact the closer you get to the basket. The demand for your concentration goes up accordingly. No matter what else you do, you must keep your eyes on the prize. Block out all that is going on around you, and keep your eyes on the target until the ball comes through the net.

What is a lay-up

A lay-up is just what it sounds like: a shot where we lay the ball up on the backboard or over the rim and into the basket. It can be done forwards, backwards, or sideways. It is a lay-up just the same.

Teaching lay-ups

I am a big believer in visualization and pantomime when teaching new skills. They are especially effective techniques when teaching lay-ups.
When teaching new concepts of leg drive and follow-through while handling a basketball and trying to throw it through the basket, consider that it might be very difficult for young players to keep track of all the factors involved. You would be well advised to simplify the process by eliminating the ball at first.
Try these techniques without a ball.
  • Line up your team in rows.
  • On the command, ”Set”, have them stand with their left leg forward and their right leg extended straight back. Knees should be bent and hips low in an athletic posture.
  • On the command, “Drive,” have them step forward with their right leg, without taking their left foot off the floor, and drive their right knee in the air. The visualization phrase that I use is "Try to hit your nose with your knee."
  • After driving the right knee, talk a little about the feeling they get when they drive the knee. They should feel their whole body lifting.
  • Next, on the command “Drive,” combine the knee lift with a jump off the left leg. It might take a few reps to co-ordinate the knee drive with the jump but it will come quickly.
  • Next, give the command "Drive," and, at the appropriate time, add the command, "Shoot." Players then go into a right- handed shooting motion. Timing is important, as you want to shoot while the player is in the air. Emphasize holding the follow-through on the shot until after they return to the floor.
  • Next, in cadence, call, "Set, Drive, Shoot." Explain that this, when done with proper timing, is the action involved in taking a lay-up.
  • When you feel that the shooters are comfortable with the right hand, alter their stance and have them practice a left- handed lay-up motion.
Once you are comfortable with that action, go to the next step
  • On the command, ”Set”, have them stand with their left leg forward and their right leg extended straight back. Knees should be bent and hips low in an athletic posture.
  • On the command, “Step Back,” players step back with their left foot so it is extended straight back and the right foot is forward.
  • On the command, “Step,” players step forward with their left leg. Follow the, “Step,” command with, “Drive,” and, “Shot,” in cadence, to create the rhythm for taking an active lay-up.
  • When you feel it is proper, switch to a left handed lay-up.
Once you are comfortable with that action, go to the next step
  • On the command, ”Set”, have them stand with their left leg forward and their right leg extended straight back. Knees should be bent and hips low in an athletic posture.
  • On the command, “Step Back,” players step back with their left foot so it is extended straight back and the right foot is forward.
  • On the command, “Step Back,” players step back with their right foot so it is extended straight back and the left foot is forward.
  • On the command, “Step,” step forward with the right foot.
  • Add the command, "Dribble." Players will then imagine they are taking one dribble with their right hand. (This is a great opportunity to teach them about the rules concerning when the ball must be dribbled in order to move their pivot foot without traveling.)
  • Follow the "Dribble" command with, "Step," "Drive," "Shoot."
  • When said in the proper cadence and with proper timing; "Set," "Step Back," "Step Back," "Step," "Dribble," "Step," "Drive," "Shoot," will give players a basic feeling and rhythm for taking lay-ups, with and without a dribble
After they are good at taking lay-ups without a basket, move to a basket; teach them the proper angle to approach the basket; and go through the same sequences shooting right-handed and left-handed.
Once they are comfortable at the basket, give the players a ball and go through the same sequences.

Teaching Points

  • You make lay-ups with your eyes.
  • Shooting is about rhythm
  • The power to get the ball to the basket comes from your drive leg. Try to touch you nose with our knee.
  • Early in the process, success has to be defined in terms of correct form rather than made baskets.
  • Focus on the process, not the results. Younger kids may have problems with balance and strength. Don’t sacrifice form for made baskets
Lay Ups - 5 Pro Finishing Moves for Guards

If you are a guard, the importance of being crafty with your finishing moves (lay ups) increases as the competition level increases. Opportunities for straight-line lay ups with the perfect driving angle rarely occur during games. And as the competition level increases, you'll find the same stuff that used to work, now gets swatted out of the lane.

If you don't believe me, watch Derrick Rose. This is a guy who has a 40some inch vertical jump, the speed and quickness of a cheetah, and is 6'3, 200 lbs and he still uses a floater to get his shots off in the lane area. We're talking about one of the best athletes in the world here.

Now, let's take a look at 5 finishing moves that you could work on:


  1. Derrick Rose Floater

    A floater is a push-like shot used to float the ball over the outreached hands of the defenders in the lane. The really good floaters will look like the player stops and shoots almost all in one motion. The quicker and more unpredictable you are with this shot, the more deadly you can be. You can do this off one foot or two feet.

    You'll see a couple of Derrick Rose floaters in this video at 0:15 and 0:25.


  2. Rondo

    This is a move that Rajon Rondo uses quite often and effectively. I first saw this move used by the legendary Hakeem Olajuwon. The same Hakeem Olajuwon that Kobe Bryant and Dwight Howard have worked with the last few summers.

    The player performs a 1-2 stop, then front pivots and shoots the ball.


  3. Ginobli Euro Step or Side Step

    This is a great finishing move popularized by Manu Ginobli. The euro step is used when the defender takes away the offensive player's driving lane, so the offensive player uses a side step to get around the defender.

    The video below shows the move as Manu moves in for the layup.


  4. Steve Nash No-Jump Lay Up

    As you face better competition, the athletes get better. Well, Steve Nash realizes he's not going to out-jump the defenders to the goal, so he out-quicks the defenders to the goal.

    So how does Nash do this? He does not jump. This works because he can get the ball up before his defender can recover and before helpside defense can rotate over to block the shot. Also, shot-blockers are accustomed to NBA guards trying to jump up towards the goal before shooting. That is why Steve Nash's no-jump lay up throws off the shot-blocker's timing as well.

  5. Steve Nash Same-Leg Lay Up

    From a young age, we've been taught to shoot right-handed lay ups by jumping off our left leg and vice-versa. For a beginner this is fine, but when you need to take an extra step to get your footing down against better competition, the defense will more likely stop you. So as players advance, I believe it's important to finish from either side jumping off of either leg and finishing with either hand. That means if you're on the right side of the basket and need to jump off of your right leg and finish with your right hand, DO IT.

    Steve Nash does a great job of combining the "No-Jump Lay Up" and the "Same-Leg Lay Up" in the video below.


Incorporate a few of these moves into your workouts and you'll turn into a better finisher around the basket.

Improve Your Ability To Finish At The Rim With The Corner Finishing Drill

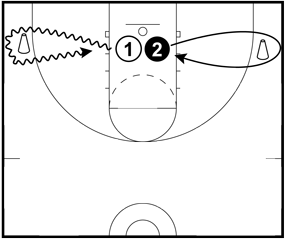
This finishing drill will improve players' conditioning, agility, dribbling, confidence, ability to make lay ups off a baseline drive, and finish near the basket.
The video below is an excerpt from our 30 Competitive Game-Like Skill Building Drills.


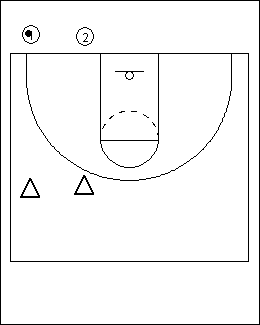
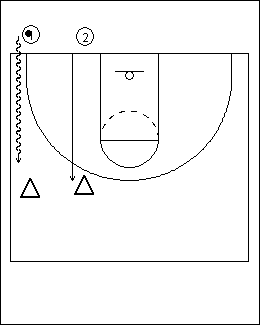
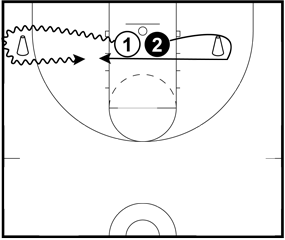
The offense and defense begin in a back to back position under the basket.
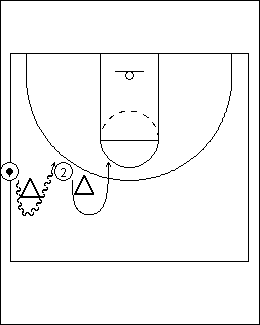
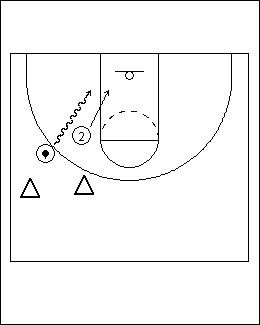
On the whistle, offense and defense go around the cones and go to the basket.
With reps and persistence, players learn how to finish at a high percentage and gain confidence.
  

Variation - Move defensive cone closer This simumlates a situation where the offensive player has to figure out a way to finish when the help defense arrives early. This can be accomplished via side steps, floaters, runners, jump stops, reverse lay ups, etc.   

More Variations
  1. Play "make it take it". If the offensive player scores the basket, they get to go one more time (max of two shots in a row). Otherwise, they take one shot and go to end of line. One of the biggest benefits to "make it take it" is that players get different matchups almost every time through the line.
  2. Instead of blowing a whistle, let the offensive player initiate the drill. Defense starts when they see the offense move. You can also let players in back of the line say "go".
  3. Move cone so help defense comes from wing
  4. Move cone so help defense comes from top
  5. Limit players to certain moves (ex: floater, one foot lay up, or power lay up only)

Points of Emphasis
  • No hard fouls. Light contact is fine, but we do not want our shooters hitting the deck in this drill. Defense can go for a block, but do not go hard into the body.
  • Make sure you are switching sides after a few reps in all of the finishing drills to get your players accustomed to attacking from both sides of the floor.
  • Work to get to the basket.
  • Eyes on the rim when finishing.

Competitive One on One Fast Break Drills - 1v1 Attack

It is unfortunate that the game players play the most is also the least relevant to the game of basketball; "One-On-One."

Go past any schoolyard and you'll see two players playing one-on-one. Take the ball out on the top of the key, take 10-12 dribbles to back the opponent down to the basket and then try to shoot over him. That is the way 99% of all one-on-one games go. It builds bad habits, limits understanding of the game and erodes needed skills.

Below are some different one-on-one basketball drills that might do a better job of improving players' skills and help them reach playing objectives. These are also great drills to simulate fast break situations.
Here is a video clip of the drills from Don Kelbick's Transition Offense and 4-Second Fast Break DVD

Instructions
Half Court 1v1 Attack
  1. Place 2 chairs just short of mid-court on the right side of the court.

  2. Players start on the baseline, opposite the chairs.

  3. The player on the outside has the ball.
  

  1. On "Go," both players take off at full speed. The player with the ball goes on the dribble, the player without the ball goes on the sprint.
  

  1. Both players go around the right side of the chair and head back toward the basket.
  

  1. Once headed back toward the basket, the player with the ball becomes offense and the player without the ball becomes the defense.

  2. Add a dribble limitation, such as 2 dribbles after turning on the chairs, to add effectiveness.
  

Full Court 1v1 Attack
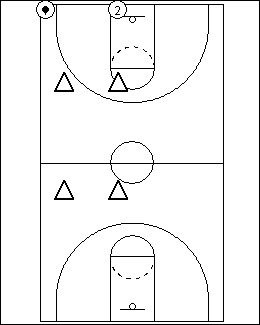
  1. Place 2 chairs on the right side of the court, a little higher than the foul line extended.

  2. Place 2 more chairs on the other side of mid-court, just above the 28' marker (or above the coach's box.

  3. Players start on the baseline and the player on the outside has the ball.
  

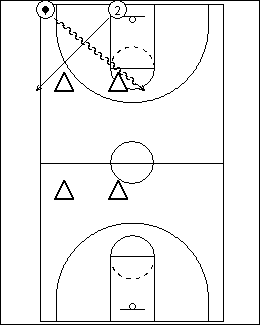
  1. On "Go," both players take off. The player with the ball goes on the dribble, the player without the ball goes on the sprint.

  2. The players cross with the dribbler going around the inside chair and the player without the ball sprinting around the outside chair.
  

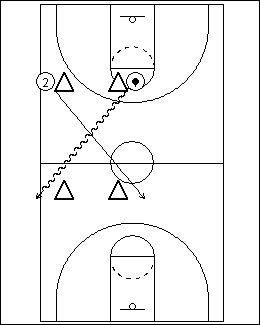
  1. Once the players clear the chairs, they cross again with the dribbler going around the outside chair and the player without the ball sprinting around the inside chair.
  

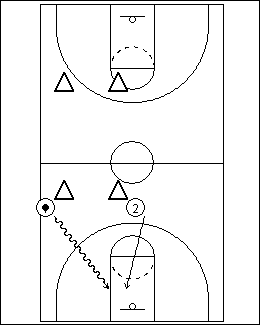
  1. Once clearing the chairs, the dribbler becomes the offensive player and the other player is the defensive player and the game is on.

  2. Add a dribble limitation, such as 2 dribbles after turning on the last chairs, to add effectiveness.
  

These basketball drills work on ball handling, explosiveness, decision making, defense in transition, finishing at the rim and are great conditioners. They are also high intensity and a lot of fun so players will enjoy them.