The next shooting drills are highly important to the shooting development process.
HOWEVER, the shooting drills that teach things like rhythm, coordination, fluidity, arc, and proper shooting release are often forgotten or neglected.
They are often misused or under-emphasized.
If you want to become a great shooter, I can not emphasize the importance of the following drills enough. They could literally be the difference between being a poor shooter and a great shooter.
Rick Penny of One Motion Shooting taught me these crucial shooting progressions that literally changed the way I taught shooting.
We will cover what we call Tuck, Set, and Go (or Release) and shooting progressions to teach the shot motion.
If you don't understand these terms... Tuck, Set, Go... please read this article...Get Instant Results With This Shooting Fundamental That Nobody Teaches (Stephen Curry Uses This). It goes into great detail about these concepts and the importance of them.
If you are serious about becoming a great shooter, it's absolutely vital that you read the shooting article.
Step 3 - Set To Go
This progression is called Set to Go. This focuses on the top half of the shooting motion.As discussed in the previous shooting article, as soon as the ball reaches approximately the shoulder position, shooters extend their legs.
If you study great shooters like Stephen Curry, the ball actually starts coming up before you extend your legs.
However, if you try to consciously do this, it can screw up your rhythm and coordination.
So we use this as a progression to develop the coordination of extending your legs to shoot as the ball passes up through the shoulder position.
Set To Go Drill
The shooter starts a few feet from the basket.
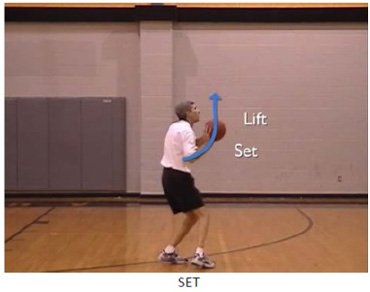 In the set position, the player’s arm angle is approximately 90 degrees and the ball is positioned near the shoulder.
Once the shooter is ready, the player extends their legs and shoots at the same time in one fluid motion. The shot is like a free throw as there is little to no jump with this progression.
We will shoot 5 to 10 shots, then take a step back. We usually do this until we reach a step in front of the free throw line.
Also, make sure to take your time and do it right on every repetition. If you build a bad habit by being sloppy, it will take you ten times as long to fix the bad habit. So be smart and get in the right position prior for every shot.
Emphasis Points
- Start from shoulder on each shot.
- Extend legs and shoot at the same time.
- Keep ball close to shoulder.
- One fluid motion - no pauses or hitches.
Shooting Workout
- 1-Hand Form Shooting Drill - 20 shots
Shoot 10 shots from 2 spots.
- 1-Hand Form Shooting With Guide Hand - 20 Shots
Shoot 10 shots from 2 spots.
- Set To Go - 40 shots
Shoot 10 shots from the distances of 3 feet, 6 feet, 9 feet, and 12 feet.
First, develop sound shooting technique. Second, as soon as you can make 28 out of 40 shots with sound shooting technique, progress to the next shooting drill.
Additional Teaching Points and Possible Errors This is not the entire shot motion that we teach. It is just part of it.
We're building our shot from the top down. Also, here are some errors that we see.
Rushed Shots
When skipping this Set To Go shooting progression in the past, we noticed that some players developed "rushed shots". If they jump and bring the ball up at the same time, this forces the upper-body motion of the shot to be too quick. On average, not always, this results in more shooting inconsistencies.
Ball Too Far From Shoulder and Body
You don't want the ball too far from the shoulder as that will create a catapulting motion with your shot. You want your shot motion to go up and out with little motion backwards. Watch the video below for further explanation.
No comments:
Post a Comment