Next, we will teach the Tuck.
This helps develop timing, rhythm, fluidity, arc, and a higher release point.
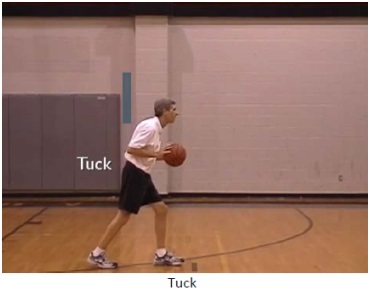 Prior to shooting, you immediately bring the ball to the Tuck position.
With the Tuck, you will have your arm angle at approximately 90 degrees with your arm parallel to the ground near your waist to shoulder level. Some players will drop to their hip and that's okay.
You immediately cushion the ball to this position when catching the ball off the pass or picking the ball up off the dribble.
Your elbow will also be tucked back near your side in a relaxed position.
S-Curve By using the Tuck, it helps you create a positive motion to the basket with a higher release point.
Rick Penny calls this ball path the S-Curve.
Common Shooting Error - The Catapult
Some players will still go a few inches back when bringing the ball up to shoot and that’s okay.
As shown in the video below, we don’t want the exaggerated catapulting or slinging motion that creates a flat arc and slightly slower shot.
With this progression, we just cover the timing of having the ball hit the Set point with legs loaded ready to extend and jump.
You simply say, “Tuck” and the shooter puts the ball in the “Tuck” position with their foot back. When you say “Set”, the player brings their foot forward and the ball up to the set position.
The timing should be so the ball moves from Tuck into the Set position as soon as the foot hits the ground.
This helps teach the player to start the upwards motion of the ball first; prior to extending their legs to jump.
You can start slower and move up to a faster speed as players start to develop the proper rhythm and coordination.
Usually, you can do this for 10 to 20 reps before progressing. You can also adjust for more or less reps depending on the situation.
We practice this with both the left and right foot.
Emphasis Points
With this progression, the shooter starts with the ball in their hands.
Make sure to emphasize a nice fluid motion with the shot. There should be no pauses or hitches in the shot motion from start to finish.
Make sure the ball starts the upward motion prior to jumping. This will just be a fraction of a second. If you notice, the timing is off. Work on the previous progression again before coming back to this drill.
We like to start this progression at about 8 to 10 feet away from the basket. We believe the tuck is needed less when closer to the basket. Sometimes, it will make sense to keep the ball high or go straight to the Set position when catching the ball.
Emphasis Points
Shooting Workout
The Tuck - Common Shooting Error And How To Fix It
Make sure that players go in an efficient path from tuck to set.
Some players with bad habits will start in the Tuck and push the ball out away from their body before reaching the Set position. This creates negative motion and often results in a catapulting motion and flatter shot. This was discussed previously.
To fix this, I will just place a hand in front of the shooter. The only way they don't hit my hand is if they go in the proper path from tuck to set.
The shooter immediately knows what it feels like to do it right or to do it wrong. The feedback is immediate.
You can do the same thing with the following shooting progression... "Tuck To Go - Start With Ball"
Here is a video explaining this error.
Something I forgot to mention in the video is that I used to put my hand beside the shooter's head next to their ear. That way, they would feel if they were slinging the ball backwards.
However, whenever I removed my hand, the same shooting habit of slinging or catapulting the basketball would come back. It drove me bonkers. When I realized that the slinging motion had more to do with the starting point and the motion coming upwards, I was able to fix the shooter more efficiently.
However, if the problem still persists after making a correction to the starting position and the upwards motion, I will put a hand next to the shooter's ear. This will help the shooter feel the slinging motion and correct it. I rarely have to do this any more if I fix the starting position and upwards motion.
Remember! These Are Just Tools To Build The Shot
I also want to reiterate that these teaching progressions are JUST tools for developing a quick and accurate shot. These progressions teach the proper starting position and the proper rhythm and coordination between the upper body and the lower body.
If these progressions are taken out of context, the drills lose their purpose.
For example, when you teach the progression of "Tuck To Go - Start With Ball", someone might argue this is too slow and you want to have your feet set as you catch the ball. This is just a tool or progression to get to that point.
Your end goal is a very quick, rhythmic shot that is highly consistent. You can see this demonstrated with the final progression below.
This helps develop timing, rhythm, fluidity, arc, and a higher release point.
Prior to shooting, you immediately bring the ball to the Tuck position.
With the Tuck, you will have your arm angle at approximately 90 degrees with your arm parallel to the ground near your waist to shoulder level. Some players will drop to their hip and that's okay.
You immediately cushion the ball to this position when catching the ball off the pass or picking the ball up off the dribble.
Your elbow will also be tucked back near your side in a relaxed position.
S-Curve By using the Tuck, it helps you create a positive motion to the basket with a higher release point.
Rick Penny calls this ball path the S-Curve.
Common Shooting Error - The Catapult
Some players will still go a few inches back when bringing the ball up to shoot and that’s okay.
As shown in the video below, we don’t want the exaggerated catapulting or slinging motion that creates a flat arc and slightly slower shot.
Tuck To Set Drill
This progression is called Tuck to Set.With this progression, we just cover the timing of having the ball hit the Set point with legs loaded ready to extend and jump.
You simply say, “Tuck” and the shooter puts the ball in the “Tuck” position with their foot back. When you say “Set”, the player brings their foot forward and the ball up to the set position.
The timing should be so the ball moves from Tuck into the Set position as soon as the foot hits the ground.
This helps teach the player to start the upwards motion of the ball first; prior to extending their legs to jump.
You can start slower and move up to a faster speed as players start to develop the proper rhythm and coordination.
Usually, you can do this for 10 to 20 reps before progressing. You can also adjust for more or less reps depending on the situation.
We practice this with both the left and right foot.
Emphasis Points
- Emphasize timing. Foot should hit ground as ball hits set point.
- Start slow and gradually speed up.
- Stay in an athletic jumping position. Do not extend legs.
Tuck To Go Drill - Starting With Ball
After the shooter gets the rhythm and timing from Tuck to Set, we’ll go to the next progression called Tuck To Go.With this progression, the shooter starts with the ball in their hands.
Make sure to emphasize a nice fluid motion with the shot. There should be no pauses or hitches in the shot motion from start to finish.
Make sure the ball starts the upward motion prior to jumping. This will just be a fraction of a second. If you notice, the timing is off. Work on the previous progression again before coming back to this drill.
We like to start this progression at about 8 to 10 feet away from the basket. We believe the tuck is needed less when closer to the basket. Sometimes, it will make sense to keep the ball high or go straight to the Set position when catching the ball.
Emphasis Points
- Emphasize timing. Foot should hit ground as ball hits set point.
- Extend legs as soon as foot hits the ground.
- Start slow and gradually speed up.
- Nice fluid motion - no pauses or hitches.
Shooting Workout
- 1-Hand Form Shooting Drill - 20 shots
Shoot 10 shots from 2 spots.
- 1-Hand Form Shooting With Guide Hand - 20 Shots
Shoot 10 shots from 2 spots.
- Set To Go - 40 shots
Shoot 10 shots from the distances of 3 feet, 6 feet, 9 feet, and 12 feet.
- Tuck To Set Drill - 20 reps each leg
You will do 20 reps with left-right footwork and 20 reps with right-left footwork.
- Tuck To Go - Start With Ball - 60 Total Shots - 30 Each Leg
You will do 3 sets of 20 shots.
Each set will have 10 shots with right-left footwork and 10 shots with left-right footwork.
Start the first set from about 8 to 10 feet away.
Depending on the strength, coordination, and age level, move further away from the basket on each set.
For younger players, you might do all 60 shots from 8 to 10 feet.
Advanced players may move back 5 feet after each set.
The Tuck - Common Shooting Error And How To Fix It
Make sure that players go in an efficient path from tuck to set.
Some players with bad habits will start in the Tuck and push the ball out away from their body before reaching the Set position. This creates negative motion and often results in a catapulting motion and flatter shot. This was discussed previously.
To fix this, I will just place a hand in front of the shooter. The only way they don't hit my hand is if they go in the proper path from tuck to set.
The shooter immediately knows what it feels like to do it right or to do it wrong. The feedback is immediate.
You can do the same thing with the following shooting progression... "Tuck To Go - Start With Ball"
Here is a video explaining this error.
Something I forgot to mention in the video is that I used to put my hand beside the shooter's head next to their ear. That way, they would feel if they were slinging the ball backwards.
However, whenever I removed my hand, the same shooting habit of slinging or catapulting the basketball would come back. It drove me bonkers. When I realized that the slinging motion had more to do with the starting point and the motion coming upwards, I was able to fix the shooter more efficiently.
However, if the problem still persists after making a correction to the starting position and the upwards motion, I will put a hand next to the shooter's ear. This will help the shooter feel the slinging motion and correct it. I rarely have to do this any more if I fix the starting position and upwards motion.
Remember! These Are Just Tools To Build The Shot
I also want to reiterate that these teaching progressions are JUST tools for developing a quick and accurate shot. These progressions teach the proper starting position and the proper rhythm and coordination between the upper body and the lower body.
If these progressions are taken out of context, the drills lose their purpose.
For example, when you teach the progression of "Tuck To Go - Start With Ball", someone might argue this is too slow and you want to have your feet set as you catch the ball. This is just a tool or progression to get to that point.
Your end goal is a very quick, rhythmic shot that is highly consistent. You can see this demonstrated with the final progression below.
No comments:
Post a Comment